Food photography may not be as popular as landscape photography or portraiture, but it’s a genre which holds many advantages over others. We all buy, prepare and consume food, so we don't need go to too much extra trouble in sourcing our subjects. It’s something that can be done in the convenience of our own homes (regardless of the weather), and by working with the seasons you have a continuously changing variety of subjects to work with.
The photographs you see in magazines and books will almost certainly have had some input from a stylist, one who is experienced with working with different foods and props in order to make everything look presentable. Perhaps most of us don’t have a natural aptitude for food styling, but simple garnishes for most dishes shouldn’t be beyond anyone’s creative capabilities. So what else does the budding novice need to know?
What to buy
Shooting food in its natural state requires that it be fresh and ripe, and free from blemishes, bruises and marks. Just like people, putting food items in front of a camera can reveal flaws that might be completely unnoticeable when viewed less critically...
While post-processing can easily deal with small hairs or other imperfections, you should ensure that whatever it is you’re buying looks as good as possible to begin with.
It sounds obvious, but it really pays to spend an extra few moments looking for the best quality food available; it will translate to a more appealing image and you won’t need to spend as much time processing.
Supermarkets generally stock the more cosmetically appealing foods, as opposed to local markets whose produce may vary more in appearance. Nevertheless, each has its advantages; while you may be able to find what you want easier in a larger store, a market is likely to sell more exotic foods. You may even find citrus fruits with a leaf or two still attached, or zuchinni complete with their flowers - things you may not ordinarily find in pre-packed supermarket produce.
Supermarkets generally stock the more cosmetically appealing foods, as opposed to local markets whose produce may vary more in appearance. Nevertheless, each has its advantages; while you may be able to find what you want easier in a larger store, a market is likely to sell more exotic foods. You may even find citrus fruits with a leaf or two still attached, or zuchinni complete with their flowers - things you may not ordinarily find in pre-packed supermarket produce.
Equipment
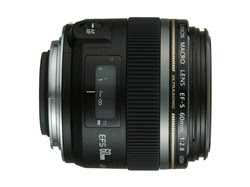
Although many professional food photographers use medium format systems for their work, both for the highest level of image quality and also for shallow depth of field, many opt for the flexibility of DSLR instead. A short to medium telephoto lens of between 60-105mm (equivalent) is ideal, allowing the photographer to quickly alternate between close-up macro images with restricted depth of field, and those further away where a number of peripheral details may be used to contextualize the main subject. Tilt-and-shift lenses can also be useful when capturing a whole table's worth of food, although these lenses are considerably more expensive than conventional optics.
Whether it's natural or artificial light you’re using, diffusers and reflectors can be incredibly helpful when working with food. You may not need to buy specific equipment if you don’t already have it; a sheet of fabric can be pinned to a window to help diffuse its light, while walls and ceilings can successfully be used as reflectors. Reflectors are particularly useful if you have a simple daylight-based setup where light is only coming from one side, such as a window or skylight.
| DSLRs with live view and a self-timer can be useful for checking focus and maintaining sharpness | A macro lens with focal length between 60-105mm is ideal for capturing most foods |
DSLRs with live view and a self-timer can be useful for checking focus and maintaining sharpness A macro lens with focal length between 60-105mm is ideal for capturing most foods
Reflectors can be used to fill in shadowy areas of dishes, particularly outdoors where you may have strong light and high contrast. If you don't have a reflector, a sheet of white card, or a nearby wall or ceiling might do the job Small spray bottles are inexpensive but useful - a fine mist of water droplets can make a huge difference to the appearance of fruit, for example, making it appear fresher and more appetizing
The old advice of using a gardening spray can is often mentioned when shooting flowers, but it applies equally to fresh foods. For a single shoot and smaller foods you generally won’t need much water, though, so you may find it easier to invest in a small bottle designed for containing beauty products. While physically smaller in size, this will do the job just as well and will give you greater control for smaller setups.
A small brush can also be helpful, either to brush away dust or hair, or for evenly distributing glazes and sauces, while a rocket blower can also be useful for foods which may be too delicate to touch without damaging, such as raspberries and other soft fruit.


